

How To Make A Demo Web App Video
Are you struggling to convey your product's value to your audience? Consider making a demo video!
What is a demo video?
A product demonstration video illustrates how your product works by showing it in action. Demo videos are a compelling way to communicate your product's value to prospective customers.
Product demos are one of the four most common types of video, so knowing how to create this type of instructional video is a great skill to learn.
But don't worry! Making a demo video is easier than you might think with the right tools and a bit of planning.
Here's how you can create a product demo video in four easy steps.
Create a demo video (Free template!)
Camtasia's templates are the fastest way to create professional-looking product demo videos.
Download
How to make a product demo video
Step 1: Plan your demo video
Failing to plan is planning to fail. To create a successful demo video strategy, there are a few points you must include. It's vitally important that you take the time to plan before jumping in to record your video.
As you plan your product demo, remember to include the following elements:
Describe the product
Provide a high-level introduction to what your product does — but keep it brief, since your audience is already interested (if they weren't, they wouldn't be viewing the video).
Provide a solution
While it can be tempting to focus exclusively on features, be sure to call out the problem(s) or pain points that your product can solve for your audience.
Show how the product works
Demonstrate the product in action. Remember not to go into TOO much detail, though. A demo video doesn't necessarily need to show all the steps. That's best done with a tutorial video.
And keep it relatively brief.
If you are working with a complex product, it might make sense to create multiple demo videos illustrating different aspects, but we recommend starting with something general that would appeal to your audience as a whole.
Provide the audience with a clear call-to-action (CTA)
At the end of the video, provide a clear, specific next step for your audience to take, such as download a trial, request more information, or even buy now.
Once you've thought through these elements, it's helpful to write a script and a storyboard so you have a solid foundation for your product video.
With your plan in hand, it's time to move on to step 2.
Step 2: Start with a template
You might think that you have to create a product demo video from scratch, but I'll let you in on a little secret:
You don't need to recreate the wheel or stare at a blank screen to make a great demo video.
Instead, use a template! We have a simple product demo template that works perfectly with Camtasia. This template is called "feature demo", and as soon as you bring it into Camtasia, you'll see that the entire video is already laid out for you.
Skip to how to create a product demo video with a template
Best of all, it's completely customizable! You can change colors, logos, fonts, and more to fit your product branding. It even comes with a default music track.
Once you've opened up your template, it's time for step 3: record your product.
Step 3: Record your product or service in action
To capture a software program in action, you'll need a tool that will let you record your screen. We offer several screen recording tools here at TechSmith.
For desktop software
Camtasia is a great choice for a demo video project since it's an all-in-one program offering screen recording and video editing.
For iOS apps
If you need to record and app or feature on an iOS device, TechSmith Capture is a great option for that. You can easily import your recording into Camtasia to edit it.)

Once you have your product pulled up on your computer, you may wish to walk through the product demonstration a few times for practice.
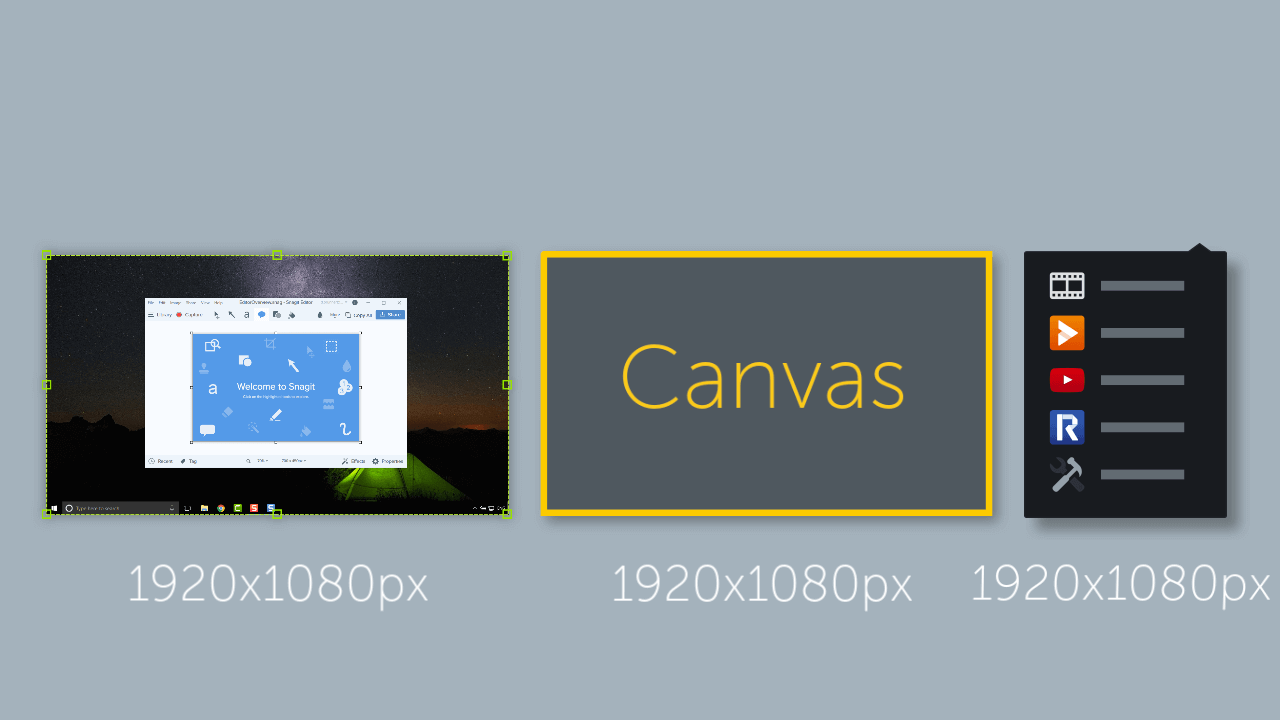
Be mindful of the desired dimensions of your finished video as you record. Stretching and resizing can result in poor quality. Considering the output size as you record will ensure that your finished video is crisp and clear.
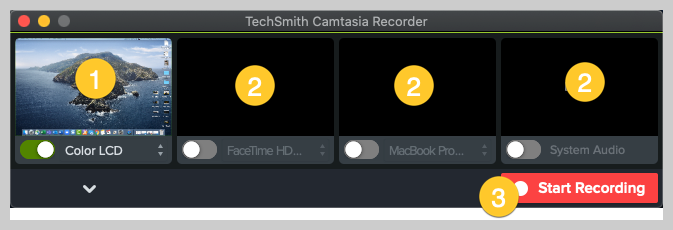
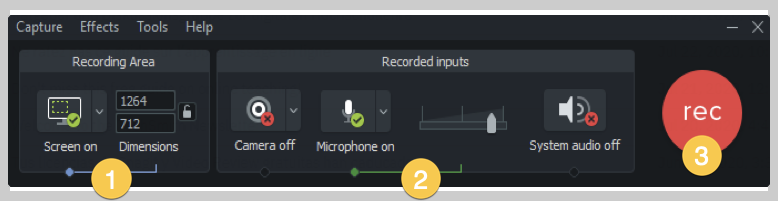
When you're ready, open Camtasia and select the record option. You'll be prompted to select the region you wish to capture.
You'll need to select the audio sources as well – system audio, microphone audio, neither, or both. Using system audio means anything that would normally play through your computer speakers will be captured. This could be significant if sounds are important to your product demo.
However, it will also record sounds such as email or meeting notifications. Make sure you adjust your settings accordingly so you aren't interrupted by unwanted beeps or tones.
If you choose to record your narration as you demonstrate, you will want to capture your microphone. However, if you have prepared a script, you will likely want to record the voiceover separately, after you've captured the onscreen action.
Now, it's time to hit the record button and walk through your demonstration.
When you've finished showing how the product works, hit stop. Use the same steps to capture any additional recordings outlined in your planning stage. Keep in mind, it's easier to remove or trim down any unwanted footage than to have to re-record a missed step later.
Step 4: Edit your Video
Now comes the fun part – editing your video! If you're new to this, don't worry. Camtasia's easy-to-use drag and drop editor makes editing simple.
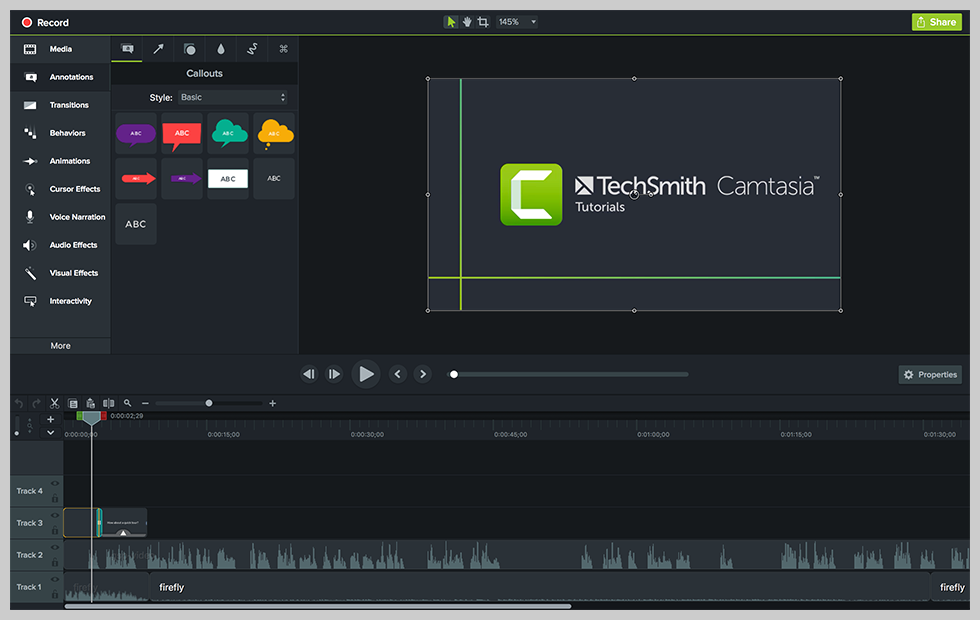
You can trim your footage, add audio narration, incorporate an animated intro, include animated effects, and more. Review the full library of instructional tutorials to familiarize yourself with all of the available options. Use the storyboard you created to guide you.
While there are lots of available editing options, there's no need to go overboard. Keep it simple so that your audience can focus on what you're trying to convey.
How to edit with templates
If you used a template to create your video, even better! Your editing process will be even more fast and efficient.
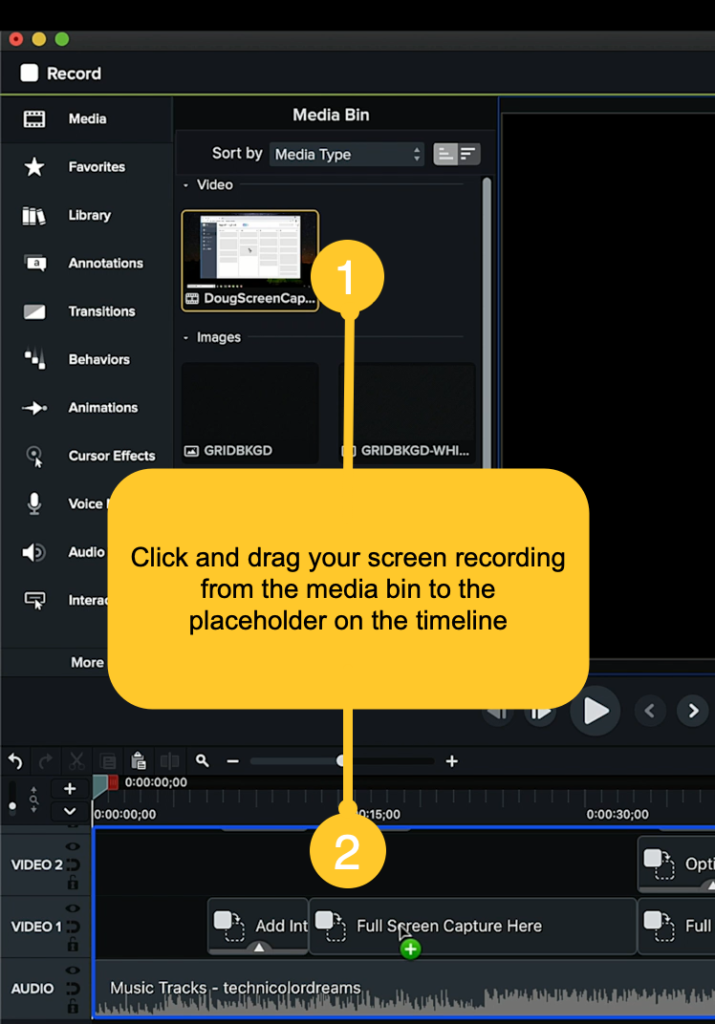
With the template already laid out on your timeline, it's as simple as taking your screen recording and dropping it into the placeholder.
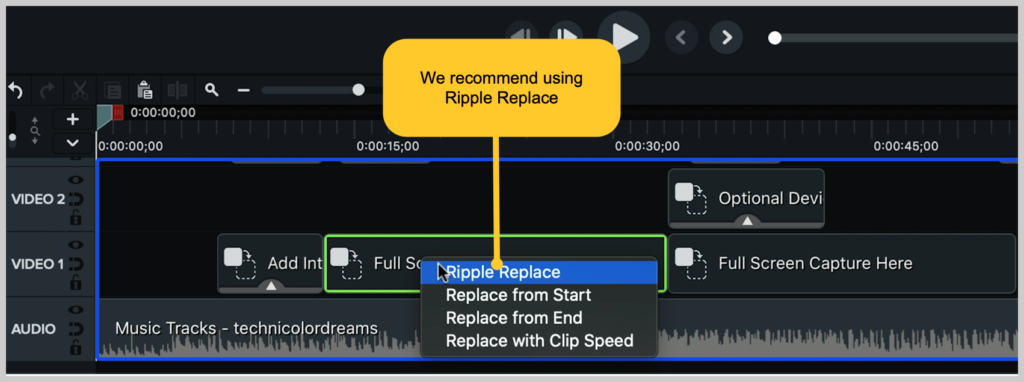
Camtasia will give you a few options, but I'd recommend using Ripple Replace, which adjusts the length of the placeholder to fit your recording (it can be either shorter or longer).
This won't remove the other items and effects from the template, but everything is customizable. You can feel free to adjust the transitions and lower third graphics as you see fit.
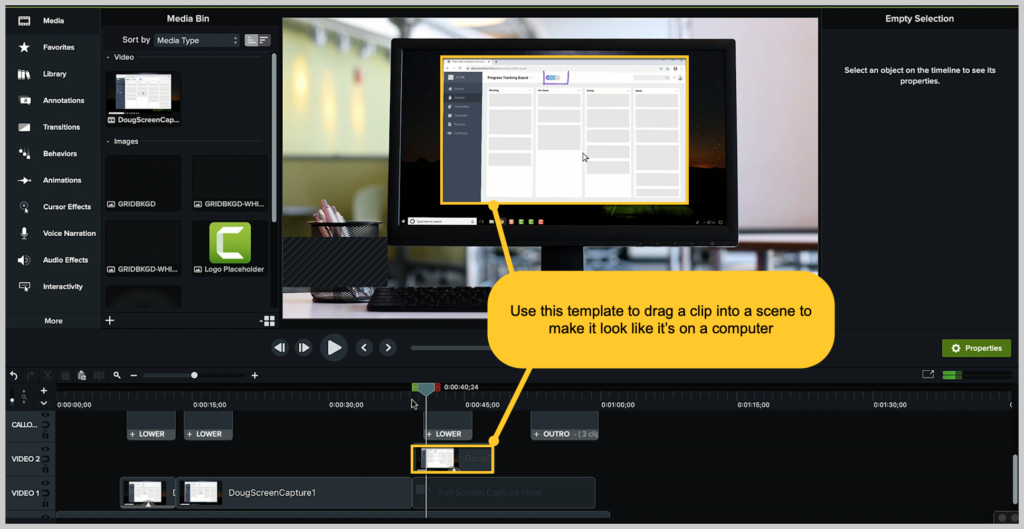
There are also options for device frames in this template, so you can easily drag your clip into a scene to make it look like it's on a computer screen, then transition into the full screen of your recording.
Pretty sweet, right?
Bonus! Reuse your template
Now that you have your demo video built out the way you like, here comes the great part: you can repurpose your template!
Once your video is done, you can actually save your finished demo video as a template. That way, the next demo video you make will have all of your brand elements ready to go.
The only thing you'll have to do is swap out some text and your screen recording.
It's that easy!
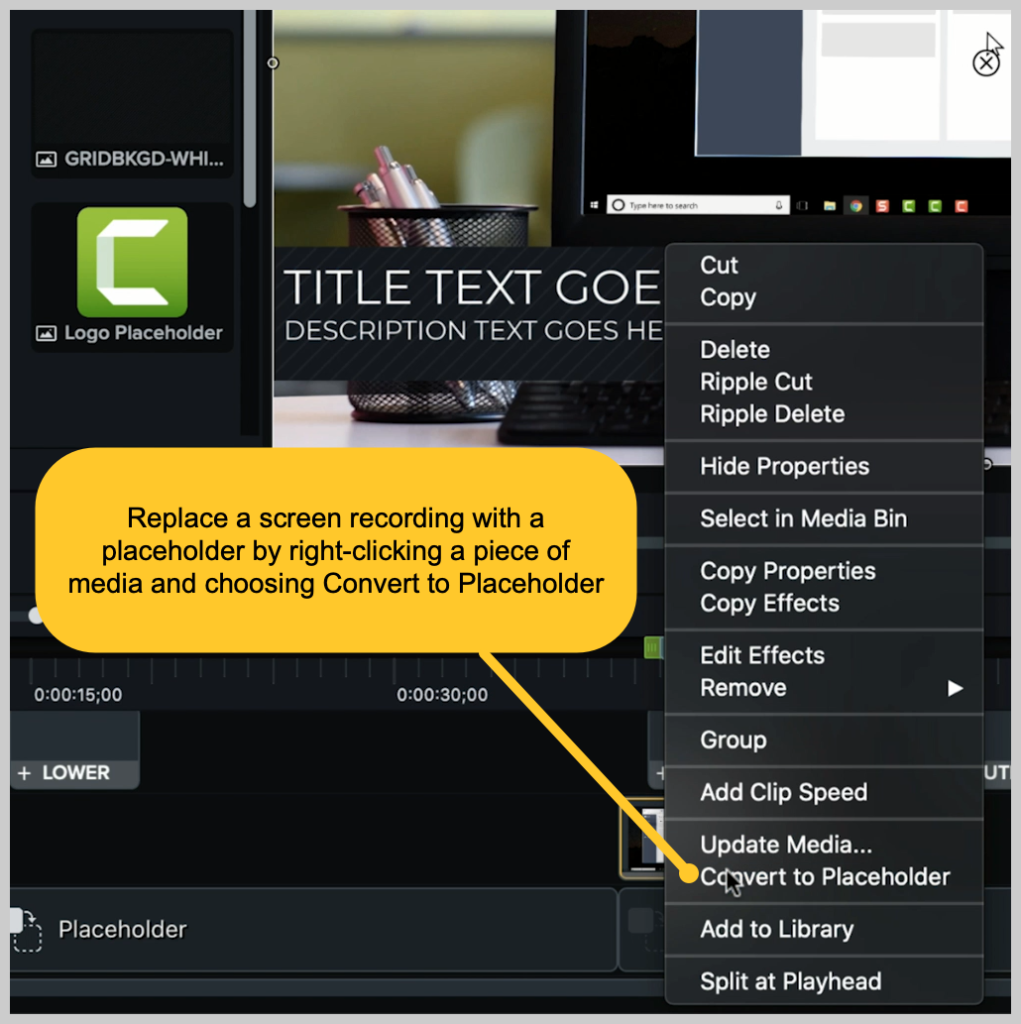
To quickly turn this video that you just made into a custom template, there is one key step to take: replace the screen recording with a placeholder. This is done by right-clicking any piece of media on the timeline and choosing Convert to Placeholder.
Then, go to File > Save as Template and provide a name for the template file. This saves the template in Camtasia on your computer.

To produce a template file to share, go to File > Export > Template, and name the file.
Camtasia exports a Camtasia Template file, known as a CAMTEMPLATE. Send the file to colleagues or place it in a shared location. All they have to do is download the template file and double click. Camtasia will add the new template to their templates menu, where it can be selected at any time.
The Camtasia template file works on both Windows and Mac, so no worries about sharing between different platforms.
Creating a product demo video is easier than you think!
There you have it! In just a few easy steps, you can be the proud creator of a product demo video. Camtasia makes it simple to record and edit with a single tool – and you can even test it out to make sure it's a good fit for you.
Create a demo video (Free template!)
Camtasia's templates are the fastest way to create professional-looking product demo videos.
Download
For a great video walkthrough of these steps, watch the tutorial below!
Editor's Note: This post was originally published in 2019 and was updated for accuracy and comprehensiveness.
How To Make A Demo Web App Video
Source: https://www.techsmith.com/blog/make-demo-video/
Posted by: wellerhatterouble1970.blogspot.com
0 Response to "How To Make A Demo Web App Video"
Post a Comment