

How To Disable Secure Boot Policy Windows 8.1
Z7_3054ICK0KGTE30AQO5O3KA30N0
hp-concentra-wrapper-portlet
![]() Actions
Actions
HP PCs - Secure Kicking (Windows 8)
This document pertains to HP and Compaq PCs with Windows 8 and Secure Kicking.
Secure Kick Configuration is a new feature of the Unified Extensible Firmware Interface (UEFI) in BIOS 8 that helps a computer resist attacks and infection from malware. When your figurer was manufactured, UEFI created a list of keys that identify trusted hardware, firmware, and operating arrangement loader code. It also created a listing of keys to identify known malware.
When Secure Boot is enabled, the computer blocks potential threats earlier they can attack or infect the computer. For case, Secure Boot can prevent your computer from starting from illegally copied CDs or DVDs that could harm the computer. Secure Boot does non lock out valid recovery discs or Windows discs.
You lot may take to disable Secure Boot in guild to use hardware (such equally older video cards) that Secure Boot does not recognize, or to boot from a CD or DVD that is not recognized. If Secure Kick does not recognize hardware, Windows does not use the hardware when it boots upward, and you may experience issues starting the computer. If Secure Boot does non recognize a video bill of fare, the computer may have a blank brandish. For more information, refer to the Troubleshooting department.
note:Figure : SecureBoot Watermark in Windows 8.1

Arrangement requirements for using Secure Boot in Windows viii
All HP and Compaq computers that were manufactured with Windows 8 tin use Secure Kick. Secure Kick is enabled by default on these computers. If you upgrade a computer manufactured with Windows 7 or earlier to Windows 8, you tin use Secure Boot only if and AMI BIOS version 8 that is compatible with UEFI (Unified Extensible Firmware Interface) is available for the computer.
notation:HP and Compaq Notebook PCs that were manufactured with Windows 7 or earlier may have an available BIOS update that allows the use of Secure Kick. For more than information, refer to Updating the BIOS.
note:HP and Compaq Desktop PCs that were manufactured with Windows 7 or earlier practise not take a BIOS version that allows the utilise of Secure Boot and 1 will non exist made available for these computers.
Using Secure Kick on older notebook computers with Windows 8
Most HP notebook computers utilise the Insyde BIOS. Employ the instructions in this section to enable or disable Secure Kick on your notebook estimator.
Enabling Secure Boot on a notebook computer in Windows 8
Secure Kick is enabled by default on computers that were manufactured with Windows 8. If Secure Boot has been disabled or if y'all are enabling a Notebook PC that was upgraded to Windows 8, follow these steps to enable it:
-
Plow off the estimator.
-
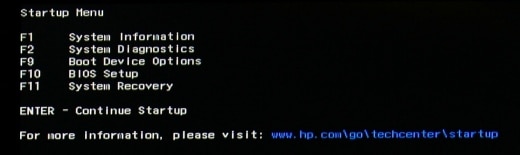
Printing the power push to turn on the figurer, then immediately press Esc repeatedly, virtually once every 2d, until the Startup Carte du jour opens.
Figure : Startup Menu
-
Press F10 to open BIOS Setup.
-
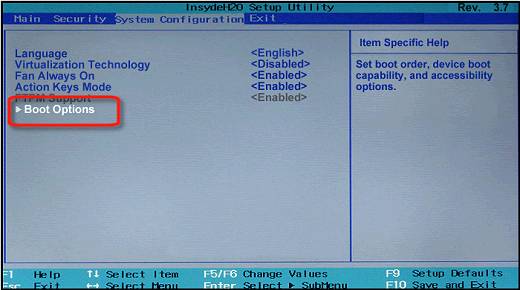
Utilize the correct pointer primal to choose the Organization Configuration menu, use the down arrow central to select Boot Options, so printing Enter.
Figure : Boot Options selection in the System Configuration window
-
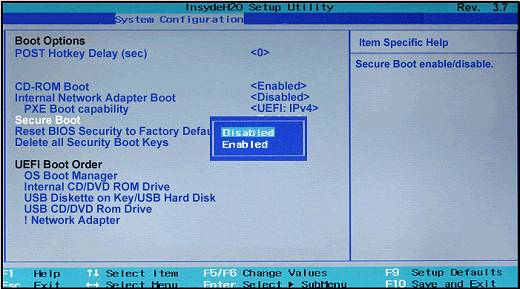
Use the down arrow key to select Secure Kick, printing Enter, then use the down arrow key to modify the setting to Enabled.
Figure : Secure Boot: Enabled

-
Press Enter to salvage the change.
-
Utilize the left arrow cardinal to select the File menu, apply the downward pointer primal to select Save Changes and Exit, then printing Enter to select Aye.
-
The Computer Setup Utility closes and the figurer restarts.
Disabling Secure Boot on notebook computers with Windows 8
Y'all may want to disable Secure Kicking in order to install new hardware or kick from a CD or DVD. Follow these steps to disable Secure Boot:
-
Turn off the computer.
-
Press the power button to plough on the computer, and immediately press Esc repeatedly, about once every second, until the Startup Carte opens.
Figure : Startup Menu
-
Press F10 to open BIOS Setup.
-
Utilise the right arrow fundamental to cull the Arrangement Configuration bill of fare, use the down pointer key to select Kick Options, then printing Enter.
Effigy : Boot Options selection in the Arrangement Configuration window
-
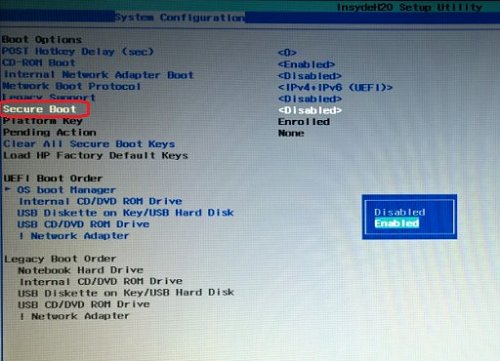
Use the down pointer key to select Secure Kicking, press Enter, and then utilize the downwards arrow key to modify the setting to Disabled.
Figure : Secure Kick: Disabled
-
Press Enter to relieve the change.
-
Use the left arrow key to select the File menu, use the down pointer fundamental to select Salve Changes and Leave, then printing Enter to select Yes.
-
The Computer Setup Utility closes and the reckoner restarts. When the computer has restarted, the Operating Arrangement Kicking Manner Change screen appears, prompting you lot to confirm the Kicking Options change. Type the code shown on the screen, then printing Enter to confirm the change and go along to Windows.
Using Secure Boot on newer notebook computers with Windows viii and Windows viii.1
Nearly HP notebook computers utilize the Insyde BIOS. Use the instructions in this section to enable or disable Secure Kick on your notebook computer using Windows eight or Windows 8.1.
Enabling Secure Kick on recent model notebook computers that include Legacy Support in Windows 8 and Windows 8.i
Secure Boot is enabled past default on computers that were manufactured with Windows eight and Windows 8.one. If Secure Boot has been disabled or if you are enabling a Notebook PC that was upgraded to Windows 8 and Windows 8.i, follow these steps to enable it:
-
Turn off the computer.
-
Press the Power Button to turn on the reckoner and press Esc repeatedly, about once every second, until the Startup Menu opens.
-
When the Startup Menu displays, press F10 to open BIOS Setup.
Figure : Startup Card
-
Use the correct arrow key to cull the System Configuration menu, use the down arrow key to select Boot Options, then printing Enter.
Effigy : Boot Options pick in the System Configuration window
-
Use the down arrow key to select Legacy Support and printing Enter, select Disabled if it is enabled and press Enter.
Effigy : Legacy Support

-
Utilize the upwards and downwardly arrow keys to select Secure Boot and printing Enter, then use the upwards and downwards arrow keys to select Enabled and press Enter.
Figure : Secure Boot
-
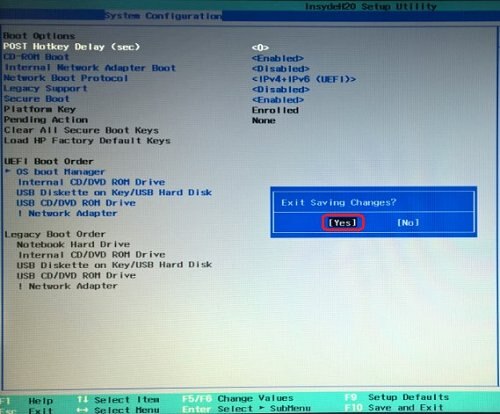
Press F10 to take the changes and utilize the left arrow key to select Yeah and press Enter to Exit Saving Changes.
The estimator automatically reboots to Windows with Secure Kicking enabled.
Figure : Exit Saving Changes
Disabling Secure Boot on recent model notebook computers that include Legacy Support in Windows 8 and Windows 8.one
You may want to disable Secure Kicking in society to install new hardware or boot from an external bootable device such every bit a CD or DVD or USB drive.
Step 1: Disable Secure Kicking and enable Legacy Boot
Follow these steps to disable Secure Kick and enable Legacy Support:
-
Plow the estimator off completely.
-
Turn on the computer by pressing the Power push and immediately press Esc repeatedly, about in one case every second, until the Startup Menu opens.
-
When the Startup Menu appears, press F10 to select BIOS Setup.
Figure : Startup Card
-
Use the right pointer fundamental to choose the System Configuration card, use the downward arrow fundamental to select Boot Options, and and so press Enter.
Figure : Boot Options pick in the Organisation Configuration window
-
Apply the down pointer fundamental to select Secure Kick, press Enter, then utilise the down arrow key to modify the setting to Disabled, press Enter.
Figure : Secure Boot
-
Utilize the up and down arrow keys to select Legacy Back up, press Enter to change the setting to Enable and press Enter again.
Figure : Legacy Back up
-
Apply the left and correct arrow keys to select Yes on the confirmation window and press Enter to enable Legacy Back up.
Figure : Confirmation window

-
Use the downwards arrow fundamental to select a device in the Legacy Boot Club menu, and press F5 and F6 to motion the device down or upwardly.
Effigy : Legacy Kick Guild

-
Press F10 to accept the changes and use the left arrow key to select Yes and printing Enter to Exit Saving Changes.
-
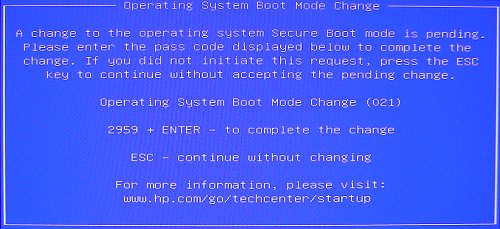
As soon as the computer starts, a bulletin may appear indicating that the boot fashion has inverse, if and then, type the four-digit code shown in the message, so printing Enter to confirm the change. Otherwise, continue with the next step.
Effigy : Boot mode change bulletin
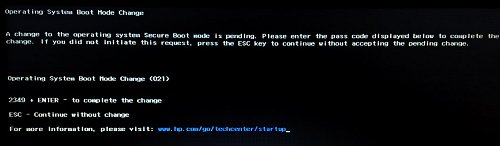
note:
Make certain yous type the code correctly, since there is no text field to meet what you are typing. This is expected behavior. When you type the numbers, the code is logged without a text field.
The calculator starts Windows 8.
Step 2: Select the drive equally the kick device
To showtime your computer from a valid bootable disc or USB drive, such as an HP recovery disc, utilise the Boot Menu to select drive every bit the kicking device.
-
Turn the calculator off completely, wait a few seconds, so turn on the calculator by pressing the Power Push and immediately press Esc repeatedly, nigh once every second, until the Startup bill of fare opens.
-
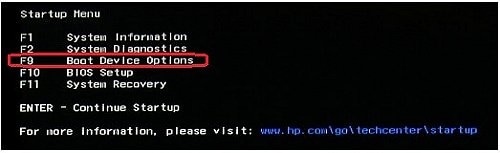
When the Startup Menu appears, printing F9 to open up the Boot Device Options.
-
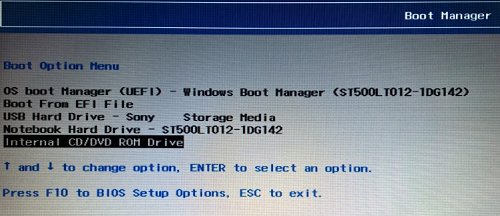
When the Boot Director Window opens, employ the upwards and downward pointer keys to select a boot device and press Enter to select an selection.
Figure : Kick Managing director Options
-
The computer starts from the bootable device selected.
-
If yous need information on how to perform a Organisation Recovery from a CD/DVD or USB drive on Windows 8 and viii.1, please refer to the HP support document: Performing an HP system recovery (Windows 8).
Using Secure Boot on a desktop computer with Windows viii
The BIOS on a desktop estimator is different from the BIOS on a notebook computer. Employ the instructions in this section to enable or disable Secure Boot on your desktop reckoner.
Enabling Secure Boot on a desktop computer with Windows 8
Secure Kick is enabled by default on computers that were manufactured with Windows 8. If Secure Kick has been disabled, follow these steps to enable it:
-
Plough off the computer.
-
Plough on the computer and immediately printing F10 repeatedly, well-nigh once every second, until the Figurer Setup Utility opens.
-
Use the left and right arrow keys to select the Security menu.
Figure : Secure Boot Configuration option in the Security window

-
Utilize the upwardly and downwards arrow keys to select Secure Kick Configuration, and then printing Enter.
-
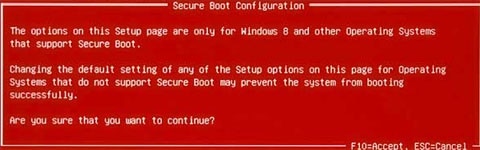
The Secure Boot Configuration warning displays. Press F10 to keep.
Figure : Secure Boot Configuration window
-
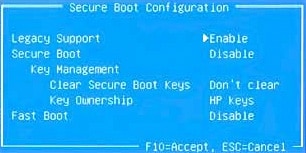
Use the left and right pointer keys to disable Legacy Support if it is enabled.
Effigy : Secure Kick Configuration window

-
Employ the up and downwards arrow keys to select Secure Kicking, then use the left and correct arrow keys to enable it.
-
Printing F10 to accept the changes.
-
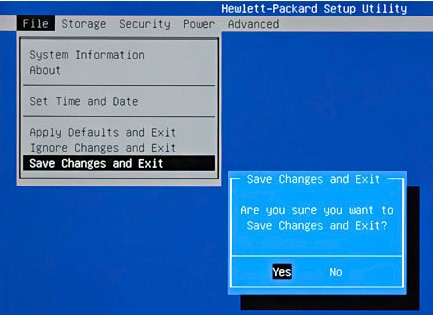
Printing F10 again, then press Enter twice to restart the computer with Secure Kick enabled.
Figure : Save Changes and Exit selection
Disabling Secure Boot on a desktop calculator with Windows 8
You lot may want to disable Secure Boot in gild to install new hardware or kick from a CD or DVD. Follow these steps to disable Secure Kick:
-
Turn off the computer.
-
Turn on the computer and immediately press F10 repeatedly, about once every second, until the Computer Setup Utility opens.
-
Use the left and right pointer keys to select the Security menu, then utilize the up and downwards arrow keys to select Secure Boot Configuration, and so press Enter.
Effigy : Secure Boot Configuration selection in the Security window
-
The Secure Boot Configuration alarm displays. Press F10 to proceed.
Figure : Secure Boot Configuration window
-
Use the upwards and downwardly arrow keys to select Secure Boot, so utilise the left and right arrow keys to change the setting to Disable.
Figure : Secure Boot Configuration window
-
Use the up and downwardly arrow keys to select Legacy Support, and so utilise the left and right pointer keys to change the setting to Enable.
-
Press F10 to accept the changes.
-
Printing F10 again, and then press Enter twice to restart the estimator.
Figure : Save Changes and Exit option
-
As before long equally the computer starts, a message appears indicating that the boot style has inverse.
Figure : Boot manner change bulletin
-
Type the iv-digit lawmaking shown in the message, and so press Enter to confirm the change.
note:
No text field displays for the code. This is expected behavior. When y'all type the numbers, the code is logged without a text field.
The computer starts Windows 8.
Frequently Asked Questions about Secure Boot in Windows 8
Click each question to notice the answer to a frequently asked question almost Secure Boot.
Troubleshooting bug with Secure Kicking in Windows viii
The following sections provide information for resolving bug with Secure Boot. Click each outcome to see its solution.
Secure Kicking bulletin appears afterward updating to Windows viii.1
After updating to Windows 8.1 a message, called a watermark, persistently appears in a corner of the screen:
Windows 8.1 Pro
Secure Boot Isn't Configured Correctly
Build 9600
Figure : SecureBoot Watermark in Windows 8.ane
This message is shown considering Windows detects Secure Boot functionality on the system, but also detects it is not enabled. Windows viii uses Secure Boot to authenticate a valid loading of the Windows for security purposes.
notation:The message does non cause system issues nor does it indicate your computer is functioning improperly. You lot can continue using your computer normally.
For many PCs, resetting the BIOS back to defaults can likewise remove this message. Use the following steps to reset the BIOS to default settings:
-
At the Start screen, press Windows
 + I.
+ I. -
While holding down SHIFT on your keyboard, click Ability , and select Shut down.
-
Wait 5 seconds for the computer to fully close downward.
-
Press the power button on your figurer to plow it on.
-
Immediately press F10 repeatedly, about once every second, until the computer enters into a BIOS Setup utility.
-
In one case the figurer opens into the Setup Utility, press F11 to restore defaults.
-
Confirm your selection past responding to the window that opens.
-
Printing F10 and ostend to save settings and leave.
-
Look for Windows eight to load and wait to run into if the message continues to appear over the screen:
If the bulletin no longer is shown, you are washed.
If the message persists, continue using these steps to enable Secure Boot.
-
Restart the estimator and immediately press F10 repeatedly, about in one case every second, until the computer enters into a BIOS Setup utility.
-
Use the arrow and Enter keys to detect and enable the Secure Kick setting. The Secure Boot setting can be found in Boot Options from the System Configuration menu (notebook PCs) or from the Security carte du jour (desktop PCs).
notation:
If a Secure Kicking setting cannot exist plant or cannot exist changed, find the Legacy Mode setting and make sure it is disabled. In the event a BIOS does not show the Secure Kick setting, and information technology cannot exist changed by resetting BIOS to defaults, the BIOS is incompatible and should be updated if an update is available from HP'south web site.
-
Printing F10 and confirm to salve settings and exit.
The Windows 8 computer does not start or displays a blank screen after installing a new video menu
If Secure Boot does non recognize a video card that you install, you may experience problems starting the computer, or at that place might exist no video output at all. Offset remove the new video card and restore the computer to its original configuration so that the computer display works. Then disable Secure Boot and enable Legacy Boot. Once Legacy Kicking is enabled, you tin install the new video card.
Step ane: Restore the computer to its original configuration
If your reckoner came with on-board video only and you installed a new video card, remove the video card.
If your calculator came with a video bill of fare installed and you replaced the original card with a new carte du jour, remove the new card. And then replace the original menu in the computer.
Stride 2: Disable Secure Kick and enable Legacy Boot
Follow these steps to disable Secure Boot and enable Legacy Boot:
-
Plow off the estimator.
-
Plow on the reckoner and immediately press F10 repeatedly, about once every 2nd, until the Computer Setup Utility opens.
-
Utilize the left and correct arrow keys to select the Security menu, then use the up and down arrow keys to select Secure Boot Configuration, and so press Enter.
Figure : Secure Kicking Configuration selection in the Security window
-
The Secure Boot Configuration warning displays. Press F10 to go along.
Figure : Secure Boot Configuration window
-
Use the up and downwardly arrow keys to select Secure Kick, so employ the left and right arrow keys to modify the setting to Disable.
Figure : Secure Kick Configuration window
-
Apply the up and downward pointer keys to select Legacy Back up, then employ the left and right arrow keys to change the setting to Enable.
-
Press F10 to accept the changes.
-
Press F10 again, then press Enter twice to restart the computer.
Figure : Save Changes and Exit selection
-
Every bit soon equally the computer starts, a message appears indicating that the boot fashion has inverse.
Figure : Boot mode alter message
-
Type the four-digit lawmaking shown in the message, then printing Enter to confirm the change.
notation:
No text field displays for the code. This is expected behavior. When you type the numbers, the code is logged without a text field.
The estimator starts Windows 8.
Step 3: Install the new video card
Plow off the computer and install the desired video menu in the computer. Brand sure the card is compatible with the computer.
The Windows eight calculator displays a blueish screen or BIOS error message afterward installing new hardware
If Secure Boot does not recognize hardware that you install, you may experience problems starting the figurer or encounter a blue screen or BIOS mistake message. You tin can remove the new hardware and replace it with the erstwhile hardware to boot into Windows normally, or yous tin can disable Secure Boot and enable Legacy Boot. Follow these steps to disable Secure Boot and enable Legacy Boot:
-
Turn off the computer.
-
Turn on the computer and immediately printing F10 repeatedly, nigh once every 2nd, until the Calculator Setup Utility opens.
note:
If you cannot enter the Computer Setup Utility by pressing F10, remove the new hardware and restore the estimator to its original configuration. And so repeat this step to enter the Computer Setup Utility.
-
Use the left and right arrow keys to select the Security menu, then use the up and down arrow keys to select Secure Boot Configuration, and then printing Enter.
Figure : Secure Kick Configuration choice in the Security window
-
The Secure Boot Configuration warning displays. Press F10 to proceed.
Figure : Secure Boot Configuration window
-
Use the up and down arrow keys to select Secure Boot, then use the left and right pointer keys to change the setting to Disable.
Figure : Secure Boot Configuration window
-
Use the upwards and down arrow keys to select Legacy Back up, then utilise the left and right arrow keys to alter the setting to Enable.
-
Printing F10 to accept the changes.
-
Press F10 again, then printing Enter twice to restart the reckoner.
Effigy : Save Changes and Exit selection
-
As soon every bit the reckoner starts, a message appears indicating that the boot mode has changed.
Figure : Boot mode change message
-
Type the four-digit code shown in the bulletin, so press Enter to confirm the change.
note:
No text field displays for the code. This is expected behavior. When you blazon the numbers, the code is logged without a text field.
The estimator starts Windows 8.
-
If y'all removed the new hardware, turn off the figurer and install the hardware in the calculator. Make certain the hardware is compatible with the computer.
I cannot boot from a CD or DVD (such as an HP Recovery disc) when Secure Boot is enabled in Windows viii
HP computers that come up with Windows 8 installed have Secure Boot enabled by default. Having Secure Kick enabled prevents legacy boot devices from starting your computer, including bootable CDs and DVDs.
To start your computer from a valid bootable disc, such as an HP recovery disc, disable Secure Boot and enable Legacy Support in the BIOS, and so use the Boot Menu to select the CD/DVD bulldoze equally the kicking device.
Step ane: Disable Secure Kicking and enable Legacy Boot
Follow these steps to disable Secure Boot and enable Legacy Kick:
-
Turn off the computer.
-
Turn on the reckoner and immediately press F10 repeatedly, about once every second, until the Computer Setup Utility opens.
-
Use the left and right arrow keys to select the Security menu, then utilize the up and down arrow keys to select Secure Boot Configuration, and so press Enter.
Figure : Secure Boot Configuration selection in the Security window
-
The Secure Kicking Configuration warning displays. Press F10 to continue.
Effigy : Secure Boot Configuration window
-
Employ the upwardly and down arrow keys to select Secure Kicking, then apply the left and right arrow keys to change the setting to Disable.
Effigy : Secure Boot Configuration window
-
Utilize the upwardly and downwardly arrow keys to select Legacy Back up, and then use the left and right arrow keys to change the setting to Enable.
-
Printing F10 to accept the changes.
-
Press F10 again, and so press Enter twice to restart the computer.
Effigy : Save Changes and Exit option
-
When the computer has restarted, use the power button to turn the calculator off.
Step 2: Select the CD/DVD drive every bit the boot device
Follow these steps to select the CD/DVD drive equally the boot device in the Kick Menu.
-
Printing the ability push button to plough the computer on. Every bit presently every bit the estimator starts, a message appears indicating that the boot style has changed.
Figure : Kicking style change message
-
Type the iv-digit code shown in the bulletin, then press Enter to ostend the change.
annotation:
No text field displays for the code. This is expected behavior. When you blazon the numbers, the code is logged without a text field.
The computer starts Windows 8.
-
Press the power button to turn off the computer, expect a few seconds, and so plow on the figurer and immediately press Esc repeatedly, nearly once every second, until the Startup carte du jour opens.
-
Press F9 to open the Boot Menu.
Figure : Boot Menu

-
Utilise the down pointer primal to select the SATA device under the ATAPI CD/DVD drive heading, then press Enter to select the CD/DVD drive as the boot device.
The estimator starts Windows eight.
-
Insert the bootable CD or DVD into the CD/DVD drive.
-
Press the power button to turn the computer off and expect well-nigh 5 seconds.
-
Press the ability push button once again to turn the computer on.
The computer starts from the CD or DVD.
Source: https://support.hp.com/us-en/document/c03653226
Posted by: wellerhatterouble1970.blogspot.com
0 Response to "How To Disable Secure Boot Policy Windows 8.1"
Post a Comment